How to reliably connect a monitor that has a DVI input (like a Dell U2412M) to HDMI

I wrote in Asus Zenbook UX31A (or any Intel HD4000/HDMI graphics) fix for no HDMI output to an external monitor in Windows 8 (should work for Windows 7) about a technique for connecting the DVI port of a monitor to HDMI output from a PC with Intel HD4000 graphics.

In that article I alluded to a potential problem in the way the Intel HD4000 chipset implements HDCP (High-bandwidth Digital Content Protection).

I now know, through buying and experimenting with different cables and HDMI/DVI adapters, that I was wrong….

I have tested the following recommended components on the (micro) HDMI output of both a Microsoft Surface RT and an Asus Zenbook UX31A and the results are repeatable – in that no other cables/adapters (that I have purchased thus far) work – apart from the following:

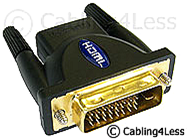
If you want to reliably connect the DVI port of a monitor – and in particular, a Dell U2412M, to micro or regular sized HDMI, you need one of these:

image

This is the HD-9002 “DVI-D Male to HDMI Female Adaptor / Convertor – 24+1 Pins – PC Card to HDMI TV” from Cabling4Less.co.uk – which at the time of writing, is £2.49 inclusive of delivery from their eBay listing or £4.80 from their Cabling4Less website.

While you can see (obviously) that this is a male DVI connector, what is not so obvious, is that the other end of this adapter is a female full size HDMI socket – for connecting to an HDMI or micro HDMI cable of your choice.

Now, while the Cabling4Less adapter did the trick with a number of HDMI cables I imagetried, an honourable mention must go to the “Premium 1.5m Gold Micro HDMI Cable to Connect Amazon Kindle Fire HD to TV LCD” from juicebitz for £3.85 delivered.
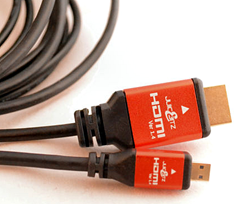
Not only does the quality of manufacture seem to be a cut above most cables (juicebitz say that they manufacture the cables themselves) but it has immediately removed the little one pixel sized random green dots that I used to get in dark areas of photos with other cables I used.

Asus Zenbook UX31A (or any Intel HD4000/HDMI graphics) Black Screen in Windows 8 workaround (should work for Windows 7)

This is Part 1 of a two part article – only separated to make it easier for those with this particular problem to search for this.

This is a very niche article, I grant you, but of you are reading it, chances are, you have this problem and while my experience is specifically with the Asus Zenbook UX31A, searching the internet reveals that it seems to be a common and generic problem with Intel HD4000 graphics.

The Problem:

Randomly (it’s not reliably reproducible) you boot your PC or return from sleep or hibernation and you are presented with just a black screen. Hitting the power button for a hard reboot doesn’t help, you just get booted back up into a black screen.

The Explanation:

I am indebted to Seth Eliot for pointing out, that when you have a black screen, this is normally because the PC is outputting a display on the (micro) HDMI port – even though you don’t have a screen connected to the HDMI port. Worse than that, the HD4000 graphics seem to have made your non-existent HDMI monitor the default display.

The Workaround:

imagePress the Windows Key and “P” together, followed by tapping the Up Arrow twice. This should select the projection screen dialogue (try it on your PC BEFORE you have this problem to simulate the action) and two presses should select “PC Screen only” and bring Windows back to your PC screen.

And if that doesn’t work?

Well, you could try turning it off and then back on again …….

Note: This is NOT a fix for the BLUE screen login problem – where you have the blue Windows login screen but no user/password box to allow you to login. I haven’t the faintest idea how to fix that!

Asus Zenbook UX31A (or any Intel HD4000/HDMI graphics) fix for no HDMI output to an external monitor in Windows 8 (should work for Windows 7)

This is Part 2 of a two part article – only separated to make it easier for those with this particular problem to search for this.

This is a very niche article, I grant you, but of you are reading it, chances are, you have this problem – and while my experience is specifically with the Asus Zenbook UX31A, searching the internet reveals that it seems to be a common and generic problem with Intel HD4000 graphics and HDMI output to an external monitor.

The Problem:

The internet is awash with folk having problems getting any output from the micro-HDMI port on their Intel HD4000 graphics chipset PC’s – and this includes the Asus Zenbook UX31A, as this thread on the Intel Community site attests.

I have the problem myself, in that I found it impossible to drive a Dell monitor in extended mode via the micro-HDMI (most Zenbook UX31A users would use the micro VGA dongle – so wouldn’t come across this problem, but those who, ahem, have lost their VGA dongle are now forced to go the micro-HDMI route….).

I am therefore indebted to Cognus who has written this article over at Eightforums, which seems to suggest that the problem is fundamentally due to a chipset design error in the way Intel implements HDCP and it is probably not possible to fix it via a driver update. This has enabled me (via trial and error) to develop a repeatable process which will, if a little inelegant, drive an external monitor via (micro) HDMI.

The (temporary) fix:

Presuming that the screen is working on your Intel HD4000 laptop, here are some pictures of the technique I use to get the micro HDMI to output to an external monitor:

1. In Windows Device Manager, right click Intel® HD Graphics 4000, select “Properties” and then select the “Driver” tab:

image

2. Click the “Uninstall” button and be sure to select the “Delete the driver software for this device” checkbox:

image

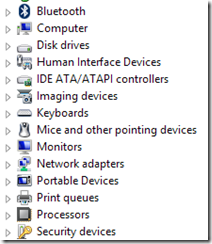
3. You will then see that your display device completely disappears from the list of devices:

image

4. Select the top item in the device list (which will have the name of your PC) and in the Action drop-down, select “Scan for hardware changes”:

image

5. At this point, there will be a bit of screen flashing and your external (micro) HDMI monitor should spring into life. You will also note that Windows has detected your HD4000 graphics display, but has installed its default driver:

image

6. Keep the faith, because very quickly, Windows seems to decide that that is not the right driver, and automatically installs Intel driver version 9.17.10.2932:

image

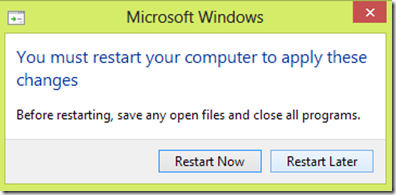
7. Hit “Restart later” – because you are going to need to repeat this process every time you can’t get an external monitor to work via HDMI – so there is no point in restarting and putting you back to square one:

image

Of course, if anyone has a better process (I have tried the latest Intel V9.17.10.2875.01 video drivers – and it doesn’t make any difference) please do comment.

Malware Hunting and Windows Troubleshooting with Mark Russinovich and Microsoft Sysinternals tools

Mark Russinovich is a Microsoft teWindows Sysinternalschnical fellow, who a few of my, ahem, more mature readership will remember from his Winternals Windows tools company – which turned into Windows Sysinternals when Microsoft bought his company and hired Mark.

Mark is a an easy to follow and very engaging presenter who delivered two great sessions at TechED 2013 US:

Case of the Unexplained 2013: Windows Troubleshooting with Mark Russinovich

In which Mark walks you “step-by-step through how he has solved seemingly unsolvable system and application problems on Windows.

With all new real case studies, Mark shows how to apply the Microsoft Debugging Tools and his own Sysinternals tools, including Process Explorer, Process Monitor, to solve system crashes, process hangs, security vulnerabilities, DLL conflicts, permissions problems, registry misconfiguration, network hangs, and file system issues.

License to Kill: Malware Hunting with the Sysinternals Tools

Mark delivers “an overview of several Sysinternals tools, including Process Monitor, Process Explorer, and Autoruns, focusing on the features useful for malware analysis and removal.

These utilities enable deep inspection and control of processes, file system and registry activity, and autostart execution points. You will see demos for their malware-hunting capabilities through several real-world cases that used the tools to identify and clean malware, and conclude by performing a live analysis of a Stuxnet infection’s system impact.

—–

If you want to increase your skills at troubleshooting Windows issues or you are currently fighting a virus/malware infection (or not even sure if you have a malware or virus infection) then these videos are very good use of your time – and of course, the whole plethora of Windows Sysinternals tools are well worth evaluating.

Note: These videos are available for download – you don’t have to only watch them streaming. No need for get_iplayer and therefore Microsoft 1, BBC Nil…

Install Windows 8 or Windows 7 from a bootable USB memory stick using the Microsoft Windows 7 USB/DVD Download tool

 This article has been updated 03/08/2013 – because Microsoft had moved the download page again…..

image

If you search around the internet, you will find all sorts of tools and tips for how to install Windows 8 (or Windows 7) without a DVD drive – but I prefer to stick with the tool from the folk who created Windows 8 – presuming that they must know something about how to do it ….

Just go to the “Microsoft Store” here:

clip_image001

and download Microsoft’s handy Windows 7 USB/DVD Download tool.

The Microsoft Windows 7 USB/DVD Download tool Tool will create a bootable USB memory stick containing everything you need to install Windows 8 (or Windows 7) from either a downloaded ISO or DVD.

Configure Outlook 2013 Search so that stuff doesn’t seem to vanish

This is a quick tip for Office 2013 (only) about a problem that had me scratching my head – so I thought it might be valuable to share.

Consider the scenario:

You are having an email conversation i.e. you are sending emails on one particular subject and folk are responding.

In your Outlook inbox, you can see the latest email response and it contains all previous reply text – so once you have read that latest email, you have no need to read and separately file all previous emails on that subject that are still in your inbox. So what do you do to speed things up?

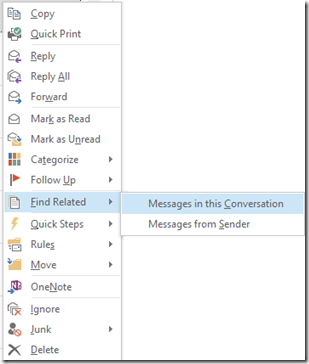
Well, if you are like me, you select the latest email reply by RIGHT clicking on it and select Find Related –> Messages in this Conversation

image

You then select ALL the emails it lists in that conversation and delete them or file them or whatever.

A little while later, you need to refer to one of the messages in this conversation that was written and sent by you, but for some reason, you can’t find it anywhere in your SENT items – yet you must have sent it, otherwise how would anyone have been able to reply?

Step forward, an ingenious Search option in Outlook 2013 that is the culprit. It is either set by default during Outlook 2013 installation or I may have mistakenly set it while tinkering (more than likely) but not appreciated the impact:

You will note that in Outlook 2013, next to the search entry, there is a little down arrow:

image

What you want, is the search to occur in the Current Folder (which in this scenario is your inbox) but you can select other options, most notably, the Dick Dastardly option Current Mailbox.

Current Mailbox, in this context, is EVERYTHING in your current mailbox – and that means that search finds and shows matches for stuff in your inbox, drafts, deleted items and most importantly, your SENT folder. The result is, that by selecting and deleting all these emails which you presume to be only emails in your inbox, you are actually selecting and deleting emails in this conversation that you have already sent – which explains why you can’t find them again ….. 

What we need, is a way for Outlook 2013 Search to default  to Current Folder – rather than Current Mailbox – and fortunately there is a setting for that:

1. Go into the Outlook 2013 “backstage” view by selecting File –> Options and then clicking on Search

2. Select Include results only from: Current Folder  rather than Current folder. Current mailbox when searching from the inbox

image

Simple when you know how!

How to make Windows 8 (and Outlook 2013) go a bit faster

For those who have already upgraded to Windows 8, or who have bought PC’s with it newly installed, you will already have discovered that it is a great new Operating System that increases productivity – once you get your head around the fact that it has two user interfaces: The normal desktop – ideally suited to those without Touch Screens and the Metro Modern Windows UI – for those with Touch screens.

Most folk with recent hardware will find that Windows 8 is extremely fast and fluid – in fact, it flies along on a Lenovo G580 in our household – so much so, that even though it doesn’t have a touch screen, users just use the Modern UI – because it just seems to offer a faster way of getting things done. However, there have been reports from folk who, on older hardware, feel that it is not so snappy. In response, what follows, are two tips that should speed things up a bit – but at the loss of some fluidity in scrolling etc.

Give it a go – and please do post a comment if you find it makes things better or worse (so I can gauge the effectiveness of this Woodygem™ ) – as both of these tips are fully reversible and will cause no damage:

Speed up Windows 8 by turning off all unnecessary animations:

1. Select “Ease of Access Center” in the Control Panel:

image

2. Select “make the computer easier to use:

image

3. Scroll down to the end of the page and put a tick in the box for “turn off unnecessary animations (when possible):

image


Speed up Outlook 2013 (might work for other versions as well)

1. In Outlook, select File –> Options

2. Select Advanced and remove the tick from the box beside “Use animations when expanding conversations and groups”

image

3. Click “OK” and you are done.


Note:  This advice is only suitable for people running Windows 8 on a PC that does not have a touch sensitive display. While it will work for PC’s with touch sensitive displays, these two tips may impact your overall experience in that things might no flow so smoothly when you are flicking things around with your finger.

With Thanks:  To Ric Harris for the initial confirmatory testing.

How to get a Windows 8 PC to connect to a network printer if you get the “no driver found” error

If you have arrived at this page, it is probably because you are trying to connect your Windows 8 (RTM) PC to a network shared printer – either a standalone printer (WiFi or ethernet connected) or a printer that is connected to another PC or server and shared out to the network.

bing has brought you here (although other Search Engines are available …) because you are scratching your head in trying to work out why this doesn’t work in Windows 8, but is fine in Windows 7. I have no idea why it doesn’t work – but I think I have a fix, read on:

I have a Windows 7 PC (called Woody – of course …) on my home network that has a Canon iP6700D directly connected to it that is shared  to all other PC’s on the home network.

All the other Windows 7 PC’s on the network can add this Canon printer and print to it fine.

Yet with a Windows 8 (RTM) PC connected to this network, while I can see this shared network printer, when I try and connect to it or add it or whatever, I get this error:

image


Note: That it says “no driver found”.


I have now worked out how to add this shared network printer to my Windows 8 PC, and it now prints fine.

Here it is on my Windows 8 PC:

image

I don’t think that the method I used is special for this particular Canon printer, it should work for any printer for which you are getting this problem – and as a bonus, this method will work for Windows 7 as well as Windows 8:

1. Navigate to Devices and Printers and select “Add Printer”

2. Select “The printer that I want isn’t selected

3. Add a “local printer or network printer with manual settings

4. Select “Create a new port

5. Type of Port – “Local Port” (oh yes, trust me on this)

6. Enter Port name. In this case, “\\Woody\Canon Inkjet ip6700D” – where Woody is the network name of the PC that is sharing the printer and Canon Inkjet ip6700D  is the name of the printer that you shared (as it appears on the network).

7. Choose the correct driver (in this case, for the Canon ip6700D – but select the correct driver for your printer):

clip_image006

8. Job done!

Free book – Windows 8 for Dummies


image

Not sure how long this will hang around – but it has got to be worth diving in at the price (free)!

I have checked and this is the full 147 page book. So you might not need it now – but sooner or later it will come in handy – trust me.

Download it now: Windows 8 for Dummies free ebook (PDF) from Dell

Microsoft Security Essentials – Free Anti-Virus software that just works

Don’t kid yourself – we all need anti-virus software – and it would really help if it was free. Right?

In fact, I tend not to be too bothered about the “free” bit. What is important to me, is to simply get the best product for the job – and if it is free, that helps. 🙂

So why would you want this?

Well, trust me – everyone needs anti-virus software in order to protect your PC from the cretins out there and if you don’t think you need it – then good luck, you are on your own …..

I tend to find that most people ask me what Anti-Virus software to use when their existing licence runs out. You know how it is. You buy a new PC. It comes pre-loaded with Norton, AVG, Kaspersky or whatever – but the licence only lasts so long before it runs out and it is nagging you for money – and that’s reasonable, because these folks do a great job, but they can’t afford to do it for free.

So, how come that Microsoft can give this away for free – and is it any good?

Yes.

spyware protection

Microsoft Security Essentials is really the consumer version of the anti-virus software that they sell to Enterprise clients – so once it is written, and paid for by commercial users, Microsoft might as well spread the love (which they do quite a lot – despite what Apple fans may have you believe).

So, it is free and has a good pedigree – but is it any good?

Yes.

It is as good as all the other products out there – for one simple reason that not a lot of people know about:

Microsoft have a huge security division who work with security services that you have heard of and probably some that you haven’t and telemetry collected from their products distributed all over the world. Each time Microsoft collects evidence of a new virus, they update their antivirus software to detect that new virus AND put that virus and detection info in a large database that Microsoft share with the world by giving free access to all the major anti-virus vendors like, yes, you guessed it, Norton, AVG, Kaspersky etc. This is called the Microsoft Active Protections Program and you can read all about it by clicking the link.

So, this Microsoft Security Essentials is free and works as well as other anti-virus products out there – anything else I should know?

Yes.

The reason that I like it, is that it is “fire and forget”. That is, once you install it, it doesn’t do nagging pop-up messages that it needs to be updated or “why not buy the pro version” blah, blah, blah …. Microsoft Security Essentials just gets on with the job and updates its virus info at least once a day (as far as I can tell). That is why I find it really great for installing on the PC’s of folk that treat you like their own personal IT support team. You know who I am talking about – your Mum, your Dad, Aunties, Uncles and old uncle Tom Cobley and all.

Imagine a world where they don’t ring you up to ask what this funny pop up message asking about a “pro subscription” is all about…. trust me, Microsoft Security Essentials is your friend.

How to do things that you can't find info about anywhere else

Tech tips and fixes

Stuff you are unlikely to find anywhere else

Sietch Tabr: El Hogar de Paul Muad'Dib

La única diferencia entre un loco y yo, es que yo no estoy loco

Mele in Spain

Modern languages student, studying in Alicante and eating far too much tapas

GripDev

Code, Apps and Thoughts @lawrencegripper